Add Background Wallpaper on your Pendrive  

Posted by Ashish in

Just Copy the below code to notepad,then save it as "desktop.ini"


[.ShellClassInfo]
IconFile=%SystemRoot%\system32\SHELL32.dll
IconIndex=127
ConfirmFileOp=0


[{BE098140-A513-11D0-A3A4-00C04FD706EC}]
Attributes=1
IconArea_Image="YourPictureName.jpg"
IconArea_Text="0xFFFFFF"
VeBRA sources - don't delete the tag above, it's there for XXXXX purposes -
[ExtShellFolderViews]
{BE098140-A513-11D0-A3A4-00C04FD706EC}={BE098140-A513-11D0-A3A4-00C04FD706EC}
{5984FFE0-28D4-11CF-AE66-08002B2E1262}={5984FFE0-28D4-11CF-AE66-08002B2E1262}

[{5984FFE0-28D4-11CF-AE66-08002B2E1262}]
PersistMoniker=Folder.htt
PersistMonikerPreview=%WebDir%\folder.bmp


1. Where "YourPictureName.jpg" is, delete that and replace with your picture name for example "superman.gif"
2. Put "desktop.ini" and your chosen picture in yourUSB Drive then Hidden it.
3. Refresh and Enjoy with your new background.
4.You can also try on C,D,E F drives.(I have Already Posted How to Place Background Picture for your Drives
How to Delete undeletable Files in Windows Xp  

Posted by Ashish in

There is another one method of deleting the undelatable files in Windows Xp using Command Prompt and Taskmanager.(Little Complicated method for Newbies)

Ok now lets see how to Delete the Undeletable Files:

1.Click on Start-->Search--> All Files and Folders.
2.Right-click on file and choose properties .

file location example: c:\windows\system32\undeleteablefile.exe

3.Open a Command Prompt window .
4.Now press CTRL+ALT+DELETE to Open Task Manager.
5.Click on the Processes tab, click on the process named Explorer.exe and click on End Process.
6.Minimize Task Manager.
7.Go back to the Command Prompt window and change to the directory where the file is located.
8.To do this, use the cd command.

cd \windows\system32

9.Type DEL where is the file you wish to delete.
Example: del undeletablefile.exe
10. Go back to Task Manager
11.In Task Manager, click File, New Task and enter EXPLORER.EXE to restart the Windows shell.
11.Close Task Manager

How to Re-Partition Hard Disk Without Losing Data  

Posted by Ashish in


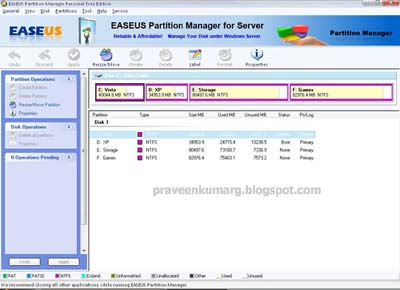
Re-Partition Your Hard Disk Without Losing Data With EASEUS Partition Manager:
Hard disk is place where to keep all data and information within the computer, it’s good to separate and keep the data in hard disk by partition. Normally most of the users will partition their hair disk to two partitions (OS and Data), this is to ensure all their data still remain in the hard disk while their operating system partition corrupted. For those hard disk where no have partition, all the data are keep together with the operating system, and there is a risk hard to recover their data when operating system was corrupted and cannot boot-in to the windows. To prevent this happen, now users can use EASEUS Partition Manager Home Edition.

What is EASEUS Partition Manager ?
EASEUS Partition Manager Home Edition is free comprehensive hard disk partition management software to let you enjoy free with all the powerful functions: Resize and Move partitions, Create, Delete and Format partitions, Hide and Unhide partitions and much more. What’s more, the freeware works perfectly with hardware RAID and Windows 2000/XP/Vista Operating Systems. Your data is completely protected during all operations. Its great free tool that users can use to re-partition hard disk rather use other partition software where need pay for the license.

Features of EASEUS Partition Manager:

  • Support hardware RAID.
  • Resize and move partitions without losing data.
  • Create, delete and format partitions with simple step.
  • Label partitions - assigned to a partition for easier recognition.
  • View Disk/Partition property of each partition.
  • Hide and unhide partitions - protect important data from unauthorized or casual access.
  • Set an active partition - specify one partition to be the boot partition.
  • Powerful safety features protect you against system failures while partitioning.
  • Step-by-step wizard walks you through partitioning process.
  • Preview any partitioning tasks before completing it.
  • Change cluster size automatically and manually.
  • Undo feature any partition step.
  • Support hard disks from 2 GB to 1 TB.
  • User-friendly interface.

Change Windows XP Home to Windows XP Professional  

Posted by Ashish in

Please try this at your own risk

Follow these steps

1. Copy the root directory and the i386 directory of the WindowsXP CD to your hard drive.

2. Extract the Bootsector of your Windows XP CD. You can use BBIE to do this.

3. Click START–>RUN–>REGEDIT

4. Highlight HKEY_LOCAL_MACHINE

5. Click FILE–>LOAD HIVE and select the Setupreg.hiv file
This file is located in the i386 folder. Use the one you extracted to your hard drive from your Windows XP CD.

6. Locate the following registry key:

HKEY_LOCAL_MACHINE\Homekey\ControlSet001\Services\setupdd

7. Edit the DEFAULT key and change the following values:

01 to 00
02 to 00

8. Change the name to the value HOMEKEY to anything.

9. Locate the following registry key:

HKEY_LOCAL_MACHINE\Homekey\ControlSet001\Services\setupdd

Edit the DEFAULT key and change the following values:

01 to 00
02 to 00
10. Highlight HOMEKEY and select FILE–>UNLOAD HIVE

Contact Me On Orkut

=>Followers<=

Powered by Blogger.