Lock a Folder With Password Using Free Folder Protector  

Posted by Ashish


All of us have some files and folders that we consider private. They can be anything from our business documents to pictures of friends and family. These are files that we don't want other people using our computer to know about. As Windows offers no way to protect our private information, most of us get in awkward situations when these files are discovered by unwanted people.

Surely, you can store this information in a hidden folder. The only problem is that anyone can easily search the contents of a hidden folder using Windows Search itself.

The only viable solution is storing this content in a password protected folder so that only those people knowing the password of the folder can access it. There are many folder locking programs available online but the problem is that most of the good ones are paid. Even if you do manage to get a good free one, you will be looked at suspiciously when people see a folder locker in the list of your installed programs.


If you too find yourself in a similar situation, you can try
Folder Protector, a password protector for Windows folders that is not only free but is also portable meaning that it does not need to be installed. Just click on the exe file and the program will start running. I have created this program based on suggestions and feature requests that I have received by email over the last two years.
Folder Protector
Folder Protector offers each user a protected folder that can only be opened by entering the password in FolderProtector. Unlike most security programs, Folder Protector is small in size (nearly 58KB) and does not show the folder that it is protecting. This gives an additional advantage that people who don't know the password do not have a target to try and hack their way into. As the software is portable, you can hide it or even delete it after protecting your folder and no one will have a clue that it was used. Then whenever you need to access protected files, you can re-download the program from this page, enter the password and access your protected files.
Download Folder Protector
Download for Windows 8, Windows 7 and Windows Vista

Download for Windows XP


How to use Folder Protector?

When you run Folder Protector for the first time, the program will ask you for a password that you want to use. Enter a password that you can remember as this will be the password to your protected folder.
Lock Folder With Password

After entering the password, the program will open a folder named SecuredFILES. This is your protected folder. You can add all your private files in this folder. This folder is located at the Desktop. After adding all your files, you may close this folder.

Then, you can use the menu in the program to lock your folder. To lock the folder, type lock as your action. After successfully locking the folder, FolderProtector will display that the folder is locked.

Free Folder Lock

Unlocking the protected folder is easy. Just type unlock as your action. Then the program will ask you to enter your password. Upon successfully entering the password, the program will display the contents of your protected folder.

Changing the Password: Just type change as your action. The program will ask you for your current password. Upon successful entry of the current password, the program will ask for your new password and change it instantly.


Acknowledgment: This software has been made possible only through the suggestions of readers of this blog, especially Ernell Albert Galido for his idea of using a menu based interface.


Windows Compatibility
: This program has been successfully tested on Windows 8, Windows 7, Windows Vista and Windows XP.

Support and Development

I will continue to develop this software further. So, your suggestions are invited. If you face any problem while using this software, you can use our support page and expect a quick reply.

Use a picture password to log into your computer  

Posted by Ashish

Windows 8 includes a new feature called Picture password, which allows you to authenticate with the computer using a series of gestures that include circles, straight lines, and taps. Enable this feature if you want a new way to access your computer or have a hard time with passwords.
  1. Open the Windows Charms.
  2. Click Settings and then More PC settings
  3. In the PC settings window click Users and then select Create a picture password

Hide Files or Folders Using Command Prompt  

Posted by Ashish

Trick to hide files and folders using Command Prompt
The most important thing is that, once hidden with this method, the files/folders cannot be viewed by any search options even if you click "Show All Hidden Files and Folders".
Hiding the most wanted files and folders is very important nowadays and it's really a tedious job too. In order to make this tedious job an easy one, i'm going to deliver you a the trick now.
For Example: You have a folder named "collegephotos" and this folder is stored in (Disk Drive E). You think that it should not be seen by strangers who use your PC.

For that you need to follow the following instructions

  1. Press windowkey+R: Run command dialog box appears.
  2. Now type "cmd" and hit enter. A command prompt window displays.
  3. Now type "attrib +s +h E:\collegephotos" and hit enter.
  4. The folder "collegephotos" will be hidden (Note: It cannot be viewed by any search options)

    (To view this folder again, use the same command but replace '+' with '-' on both flags 's' and 'h')

Mobile Phone Tips and tricks  

Posted by Ashish in


.::NOKIA::.    TIPS & TRICKS
These Nokia codes will work on most Nokia Mobile Phones,

Code
Description
*3370#
Activate Enhanced Full Rate Codec (EFR) - Your phone uses the best sound quality but talk time is reduced my approx. 5%
 
#3370#
Deactivate Enhanced Full Rate Codec (EFR)
 
*4720#
Activate Half Rate Codec - Your phone uses a lower quality sound but you should gain approx 30% more Talk Time.
 
#4720#
Deactivate Half Rate Codec.
 
*#0000#
Displays your phones software version, 1st Line : Software Version, 2nd Line : Software Release Date, 3rd Line : Compression Type.
 
*#9999#
Phones software version if *#0000# does not work.
 
*#06#
For checking the International Mobile Equipment Identity (IMEI Number).
 
#pw+1234567890+1#
Provider Lock Status. (use the "*" button to obtain the "p,w" and "+" symbols).
 
#pw+1234567890+2#
Network Lock Status. (use the "*" button to obtain the "p,w" and "+" symbols).
 
#pw+1234567890+3#
Country Lock Status. (use the "*" button to obtain the "p,w" and "+" symbols).
 
#pw+1234567890+4#
SIM Card Lock Status. (use the "*" button to obtain the "p,w" and "+" symbols).
 
*#147#
(vodafone) this lets you know who called you last.
 
*#1471#
Last call (Only vodofone).
 
*#21#
Allows you to check the number that "All Calls" are diverted to.
 
*#2640#
Displays security code in use.
 
*#30#
Lets you see the private number.
 
*#43#
Allows you to check the "Call Waiting" status of your phone.
 
*#61#
Allows you to check the number that "On No Reply" calls are diverted to.
 
*#62#
Allows you to check the number that "Divert If Unreachable (no service)" calls are diverted to.
 
*#67#
Allows you to check the number that "On Busy Calls" are diverted to.
 
*#67705646#
Removes operator logo on 3310 & 3330.
 
*#73#
Reset phone timers and game scores.
 
*#746025625#
Displays the SIM Clock status, if your phone supports this power saving feature "SIM Clock Stop Allowed", it means you will get the best standby time possible.
 
*#7760#
Manufactures code.
 
*#7780#
Restore factory settings.
 
*#8110#
Software version for the nokia 8110.
 
*#92702689#
Displays - 1.Serial Number, 2.Date Made, 3.Purchase Date, 4.Date of last repair (0000 for no repairs), 5.Transfer User Data. To exit this mode you need to switch your phone off then on again.
 
*#94870345123456789#
Deactivate the PWM-Mem.
 
**21*number#
Turn on "All Calls" diverting to the phone number entered.
 
**61*number#
Turn on "No Reply" diverting to the phone number entered.
 
**67*number#
Turn on "On Busy" diverting to the phone number entered.
 
12345
This is the default security code.
 
press and hold #
Lets you switch between lines.

TURN ON UR PC IN JUST 10 SECONDS  

Posted by Ashish in

TURN ON UR PC IN JUST 10 SECONDS
Aight so u wanna know how to turn the pc on in 10 seconds (may vary)Aight heres what u have to do to turn ur pc on in 10 seconds

Aite Click on the start button then press R it will take u to Run well go to run
n type Regedit
press enter
this will open Registery Editor
now look for the key

HKEY_LOACAL_MECHINE\SYSTEM\CurrentControlSet\Contr ol\ContentIndex

now there find the Key Called
"Startup Delay"
Double Click On It
Now where its Base
Click Decimal
Now its Default Value Is 4800000 (75300:hexadecimal)
Change The Value To 40000
here u go u have done it
now close the Registery Editor and Restart Your Computer
You'll See The Result
Comments Apriciated

Add Background Wallpaper on your Pendrive  

Posted by Ashish in

Just Copy the below code to notepad,then save it as "desktop.ini"


[.ShellClassInfo]
IconFile=%SystemRoot%\system32\SHELL32.dll
IconIndex=127
ConfirmFileOp=0


[{BE098140-A513-11D0-A3A4-00C04FD706EC}]
Attributes=1
IconArea_Image="YourPictureName.jpg"
IconArea_Text="0xFFFFFF"
VeBRA sources - don't delete the tag above, it's there for XXXXX purposes -
[ExtShellFolderViews]
{BE098140-A513-11D0-A3A4-00C04FD706EC}={BE098140-A513-11D0-A3A4-00C04FD706EC}
{5984FFE0-28D4-11CF-AE66-08002B2E1262}={5984FFE0-28D4-11CF-AE66-08002B2E1262}

[{5984FFE0-28D4-11CF-AE66-08002B2E1262}]
PersistMoniker=Folder.htt
PersistMonikerPreview=%WebDir%\folder.bmp


1. Where "YourPictureName.jpg" is, delete that and replace with your picture name for example "superman.gif"
2. Put "desktop.ini" and your chosen picture in yourUSB Drive then Hidden it.
3. Refresh and Enjoy with your new background.
4.You can also try on C,D,E F drives.(I have Already Posted How to Place Background Picture for your Drives

How to Delete undeletable Files in Windows Xp  

Posted by Ashish in

There is another one method of deleting the undelatable files in Windows Xp using Command Prompt and Taskmanager.(Little Complicated method for Newbies)

Ok now lets see how to Delete the Undeletable Files:

1.Click on Start-->Search--> All Files and Folders.
2.Right-click on file and choose properties .

file location example: c:\windows\system32\undeleteablefile.exe

3.Open a Command Prompt window .
4.Now press CTRL+ALT+DELETE to Open Task Manager.
5.Click on the Processes tab, click on the process named Explorer.exe and click on End Process.
6.Minimize Task Manager.
7.Go back to the Command Prompt window and change to the directory where the file is located.
8.To do this, use the cd command.

cd \windows\system32

9.Type DEL where is the file you wish to delete.
Example: del undeletablefile.exe
10. Go back to Task Manager
11.In Task Manager, click File, New Task and enter EXPLORER.EXE to restart the Windows shell.
11.Close Task Manager

How to Re-Partition Hard Disk Without Losing Data  

Posted by Ashish in


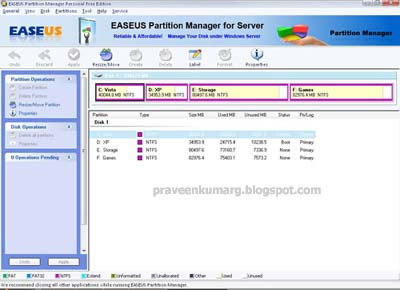
Re-Partition Your Hard Disk Without Losing Data With EASEUS Partition Manager:
Hard disk is place where to keep all data and information within the computer, it’s good to separate and keep the data in hard disk by partition. Normally most of the users will partition their hair disk to two partitions (OS and Data), this is to ensure all their data still remain in the hard disk while their operating system partition corrupted. For those hard disk where no have partition, all the data are keep together with the operating system, and there is a risk hard to recover their data when operating system was corrupted and cannot boot-in to the windows. To prevent this happen, now users can use EASEUS Partition Manager Home Edition.

What is EASEUS Partition Manager ?
EASEUS Partition Manager Home Edition is free comprehensive hard disk partition management software to let you enjoy free with all the powerful functions: Resize and Move partitions, Create, Delete and Format partitions, Hide and Unhide partitions and much more. What’s more, the freeware works perfectly with hardware RAID and Windows 2000/XP/Vista Operating Systems. Your data is completely protected during all operations. Its great free tool that users can use to re-partition hard disk rather use other partition software where need pay for the license.

Features of EASEUS Partition Manager:

  • Support hardware RAID.
  • Resize and move partitions without losing data.
  • Create, delete and format partitions with simple step.
  • Label partitions - assigned to a partition for easier recognition.
  • View Disk/Partition property of each partition.
  • Hide and unhide partitions - protect important data from unauthorized or casual access.
  • Set an active partition - specify one partition to be the boot partition.
  • Powerful safety features protect you against system failures while partitioning.
  • Step-by-step wizard walks you through partitioning process.
  • Preview any partitioning tasks before completing it.
  • Change cluster size automatically and manually.
  • Undo feature any partition step.
  • Support hard disks from 2 GB to 1 TB.
  • User-friendly interface.

Change Windows XP Home to Windows XP Professional  

Posted by Ashish in

Please try this at your own risk

Follow these steps

1. Copy the root directory and the i386 directory of the WindowsXP CD to your hard drive.

2. Extract the Bootsector of your Windows XP CD. You can use BBIE to do this.

3. Click START–>RUN–>REGEDIT

4. Highlight HKEY_LOCAL_MACHINE

5. Click FILE–>LOAD HIVE and select the Setupreg.hiv file
This file is located in the i386 folder. Use the one you extracted to your hard drive from your Windows XP CD.

6. Locate the following registry key:

HKEY_LOCAL_MACHINE\Homekey\ControlSet001\Services\setupdd

7. Edit the DEFAULT key and change the following values:

01 to 00
02 to 00

8. Change the name to the value HOMEKEY to anything.

9. Locate the following registry key:

HKEY_LOCAL_MACHINE\Homekey\ControlSet001\Services\setupdd

Edit the DEFAULT key and change the following values:

01 to 00
02 to 00
10. Highlight HOMEKEY and select FILE–>UNLOAD HIVE

How to save photo from orkut album  

Posted by Ashish in

Friends actually its not possible using HTML that some site show you a picture and you can’t save it.Actually you have the picture if you have seen it on website!

Here I will tell you some methods using that you can save a picture from orkut.

1. Easiest method is open a new tab in firefox ( CTRL + T ) and drag that picture to it.You will get right click ability , now you can save the picture D-:

2. 2nd easy way is take a print screen.

For this open that photo,put browser in full screen mode is photo is bigger (F11 shortcut for Firefox) , Press print screen button on keyboard ( Usually above Insert key) .

Now go to any graphics program like paint or photoshop and press CTRL V

That is crop the image you need.

3. Next is taking the image from ur cache.Cache is the memory where browsers stores webpage and its content temperory.Go to it ,find the image and copy it to some other folder.

Hope you enjoyed your friend’s pic.

Re-Enable Click on yrs Friend Album Photos  

Posted by Ashish in

To Re-Enable Click on yrs Friend AlbumPhotos Go to Tools > Page Info > Media and Scroll up or down to get the protected photo image Url ,Or Click Save as Directly from there to save that picture from orkut album.

save photos from orkut album


This Trick will help you Getting Url of that Picture , Then simply paste that url in Adress Bar and Hit Enter from there you can save yours Friends Image In Yours System . :)

Shutdown Option in Right Click of My Computer  

Posted by Ashish in

Do the following Steps:

1. Open Notepad.
2. Select and copy the following text and paste it in notepad.

reg add "HKCR\CLSID\{20D04FE0-3AEA-1069-A2D8-08002B30309D}\shell\[Shutdown]\command" /ve /t REG_EXPAND_SZ /d "shutdown -s -f -t 00" /f

3. Click the File --> Save As.... from notepad menu.
4. Now type the file name as abc.bat and select file type as All Files.
5. Save the file.
6. Now double click on the saved file.
7. Refresh the desktop.
8. Right click on my computer a new option will be added.

Resolve windows genuine advantage notification  

Posted by Ashish in

First Method- Hey if you want to remove WGA Notification and never allow it to popup again then you may try the following steps:

1. Download Reshack(freeware)
2. Restart your computer in safe mode
3. Open reshack and from it open
LegitCheckControl.dll(located in the system 32 folder.
4.Delete all the resources(Strings, Dialog, etc) from the file and then save it.
5. Repeat the same process for WgaLogon.dll and WgaTray.exe.
6. Open task manager and from the process tab end the proces named– wgatray.exe
7. open regedit
8.Browse to the following location:
HKEY_LOCAL_MACHINE\SOFTWARE\Microsoft\
Windows NT\CurrentVersion\Winlogon\Notify
9.Delete the folder ‘WgaLogon’ and all its contents
10. Browse to the following location:
HKEY_LOCAL_MACHINE\SOFTWARE\Microsoft\Windows\Windows Genuine Advantage
11. Delete the folder ‘Windows Genuine Advantage’ and all its contents
12.Reboot Windows XP.

WGA Notification is removed from your computer and it will never popup again!

THIS ONE WORKS!

Second Method- thank for the autoruns.exe
run the autoruns.exe, then find the wgalogon.dll, then unchecked the wgalogon.dll
then restart you computer….
it works to me…
this is the link if you want the download autoruns.exe

Third Method- ANOTHER TIP FOR THOSE WHO CANT START THEIR COMPUTER, BECAUSE OF A FAKE COPY SYSTEM!

When your starting your computer plug in your external harddrive and let the computer read it. restart your computer if u cant get in after the computer have reading it. Hopefully you will get in. It might take a little while before windows opens but to be sure, it will probably say before it starts “Windows starts”
My external harddrive is a LaCie (not a laptop harddrive) I don’t know if laptops external hardrives works to start your computer.

SoftwarePassport Armadillo Professional Public and Custom Build v6.60.0140  

Posted by Ashish in


SoftwarePassport Armadillo Professional Public and Custom Build v6.60.0140
Win App | 42mb

SoftwarePassport technology expands your global sales capabilities while providing maximum protection for your digital assets. It contains powerful features such as flexible server-based licensing and activation, trialware distribution and marketing, in-application purchasing and sophisticated country based licensing to name just a few. Altogether, they enable software publishers like you to grow revenue

Features:

* Exposing your products to rapidly expanding global markets,
* Identifying who is buying and using your software,
* Maximizing the lifetime value of your buyers whether they are consumers, small to mid-size businesses or enterprises, and
* Attracting new customers in lucrative and untapped markets.

Download Link

TMS Flexcel Studio for .NET 4.9.6.0  

Posted by Ashish in


TMS Flexcel Studio for .NET v4.9.6.0 | 19.6 MB

100% managed code Excel file manipulation engine & Excel & PDF report generation for .NET & .NET Compact Framework

Feature overview

* Generates Excel files from WinForms, WebForms ASP.NET, PocketPC applications, webservices on the fly and fast with FlexCel Studio for .NET
* Native .NET components (no additional OLE/dlls required) allowing to read, create and modify native Excel (XLS) files without needing to have Excel installed.
* Supported Excel 97 file formats and up.
* Native PDF file export
* Exceptionally fast and solid hand tuned XLS engine capable of generating thousands files per minute.
* Able to modify xls files and keep almost everything existing on the original file, from macros to activex objects.
* Recalculation of more than 200 Excel functions.
* Ability to read and write encrypted xls files.
* Completely written in C# 100% managed code, with no interop and no p/invokes.
* Runs on .NET 1.1, .NET 2.0, Mono and the .NET Compact Framework.
* Templates can be stored inside your executable file, in a database or in any place from where you can access it as a stream.
* Extensive API is available with which you can programmatically write and read files, with formatting info, images comments, etc.
* Export to HTML in HTML 4.01 strict or XTHML 1.1 and fully standards compliant
* Report Engine that allows to create complex reports using Excel as your report designer, so your final users can modify them. You can use images/comments/conditional formats/merged cells/pivot tables/charts and almost anything you can think of on those reports.

What’s new: v4.9.6.0

* New : Delphi Prism support. All demos have been converted to Delphi Prism, installation now installs into Delphi prism, and APIMate can generate Delphi Prism code.
* New : Ability to modify chart series from the API
* New : Full support for working with named styles from the API
* New : TTC font support when exporting to PDF
* New : SetExpression method in Flexcel Report
* Improved : HTML Rendering
* Improved : Speed of rendering conditional formats
* Improved : Speed in formula recalculation
* Various smaller fixes & improvements

Download Link

Photo Effects 1.75  

Posted by Ashish in


Photo Effects is a new program for processing photos with the help of
various filters. With it, you can completely transform any image. The
program allows you to use more than 50 effects, including (b-o-th)
traditional and original ones. You will be able to take a look at your
photos in the rain and snow, in fog and up in the sky, add some sun
light to it or swirl it in a typhoon…

Download Link

Outpost Firewall Pro 6.7.2930  

Posted by Ashish in


Outpost Firewall Pro 6.7.2930 Beta | 30 Mb

* Advanced firewall for secure connections
* Antispyware to keep your PC spyware-free
* Host protection to block zero-day threats
* Web control to protect your PC from web-borne threats

Safety on the Internet
The two-way firewall stops inappropriate or malicious access to your computer from both internal (LAN) and external (Internet) sources. As a frontline defense, it prevents malware from spreading or “phoning home”, providing protection against hackers, loss of personal data, unknown malware, and unauthorized program activity.

Preemptive threat protection
Outpost’s Host Protection module monitors how programs interact to protect your system against high-level security breaches and has passed all well-known leaktests to prevent unauthorized transmission of information from your PC.

No more spyware!
Eliminate spyware with Outpost’s dedicated antispyware utility. Regular updates and always-on monitoring ensure that spyware cannot activate and cause damage to your data or divert your applications.

Secure web surfing
The versatile Web Control module safeguards you against the Internet’s darker side. It steers you away from websites infected with drive-by downloads, prevents the inadvertent disclosure of personal information, limits your exposure to potentially unsafe web properties, and keeps your identity private.

Bulletproof self-defense
Outpost cannot be deactivated by targeted attacks, ensuring continuity of protection.

Performance-driven operation
No matter what you do on an Outpost-protected computer, it will always feel like it’s brand new because the program uses so few system resources. The key engine has been optimized to deliver revolutionary speed efficiency, so you can focus on using your computer productively, not worrying about security issues.

Power without complexity
Whether you’re a security novice or expert, you can easily configure Outpost Firewall Pro to meet your needs. Thanks to automated and context-sensitive help, the firewall can learn how to handle alerts and make decisions for you, so you can focus on what you want to do, and leave the security to Outpost!

Download Link

Ardamax Keylogger v3.0 License included  

Posted by Ashish in


Ardamax Keylogger is a useful keylogger that will record users activity and will save it to a logfile. It’s very easy to use.

The logfile can be viewed as a text or web page. Use this tool to find out what is happening on your computer while your away, maintain a backup of your typed data automatically or use it to monitor your kids.

Features
· Hidden mode - Ardamax Keylogger will run in hidden mode, preventing users from knowing it is active. It will NOT show under Uninstall list, the Task list, or the Application menu!
· Keystroke monitoring - Track all keystrokes pressed. If a keystroke is pressed, Ardamax Keylogger will secretly record it and save it to a hidden log file for you to view at a later date.
· Email log delivery - keylogger can send you recorded logs through e-mail delivery at set times - perfect for remote monitoring!
· Application tracking - Ardamax Keylogger makes it easy for you to find out where exactly a keystroke was pressed. Whenever a keystroke is typed, Ardamax Keylogger will record the application that was in use that received the keystroke!
· Time/Date tracking - For extra precision, Ardamax Keylogger allows you to pinpoint the exact time a window received a keystroke! Perfect for when you leave Ardamax Keylogger running for days at a time and need to know when a specific keystroke was pressed!
· Automatic startup - Ardamax Keylogger will launch itself each and everytime you bootup your PC.
· Automatic startup in hidden mode- Configure Ardamax Keylogger to start recording keystrokes in hidden mode.
· Selectable log viewer - Select which file format (plain text or web page) you wish to use to display your recorded Ardamax Keylogger keystroke logs.
· Friendly interface - Ardamax Keylogger contains an extremely easy-to-use user interface, which will allow you to familiarize yourself with the software in no time!

Download Link

TrojanHunter 5.1.975  

Posted by Ashish in


TrojanHunter is an advanced trojan scanner and toolbox, that searches for and removes trojans from your system. It uses several proven methods to find a wide variety of trojans such as file scanning, port scanning, memory scanning and registry scanning. The difference to many other trojan scanners is that TrojanHunter also allows you to add custom trojan definitions and detection rules using the easy to understand dialogs. It includes several additional tools, including a NetStat viewer, Memory String Extractor, Process Viewer, Auto-Start Explorer and various plug-ins for advanced users. TrojanHunter comes with a Live Update features that keeps the Trojan signatures current.

TrojanHunter is a powerful application designed to detect and remove trojans. With its unique scan engine capable of searching every hiding spot on your computer for trojans, you can be assured of having the most advanced trojan protection available. Featuring an intuitive user interface and a scanner capable of thoroughly examining your files, system registry, open ports and running processes it gives you all-round protection against trojans. With an easy-to-use Scanner and a Guard that scans in the background TrojanHunter is a must-have complement to your virus scanner.

TrojanHunter is a highly engineered program capable of searching your system thoroughly for any sign of a trojan horse. Unlike other trojan scanners, TrojanHunter will not only scan files, but will penetrate into every conceivable place where it is possible to detect a trojan:
• File scanning scans files for trojans, including Zip files, Rar files and binded executables.
• The extremely powerful memory scanning technology of TrojanHunter scans your computer’s main memory for running trojans. Using this technique, TrojanHunter is able to find any packed variation of a trojan.
• Registry scanning searches through the Windows registry for any autostart or configuration entry belonging to a trojan.
• The port scan alerts you if any port that is open on the system matches one known to be used by a trojan.
• Inifile scanning checks .ini-files for configuration or autostart entries created by trojans.
• Script scanning for finding trojans in BAT files, VBS scripts, active HTML content and more… In addition to the above main detection methods, the plug-in framework of TrojanHunter provides additional ways of detecting trojans; the extension checker plug-in, for example, will alert you to any executable files with double extensions, a method commonly used to sneak trojans onto a system.

Features:
• High-speed file scan engine capable of detecting modified trojans
• Memory scanning for detecting any modified variant of a particular build of a trojan
• Registry scanning for detecting traces of trojans in the registry
• Inifile scanning for detecting traces of trojans in configuration files
• Port scanning for detecting open trojan ports
• The Advanced Trojan Analyzer, an exclusive feature of TrojanHunter, is able to find whole classes of trojans using advanced scanning techniques
• TrojanHunter Guard for resident memory scanning - detect any trojans if they manage to start up
• LiveUpdate utility for effortless ruleset updating via the Internet
• Add custom trojan definitions and detection rules
• Process list giving details about every running process on the system, including the path to the actual executable file
• Accurate removal of all detected trojans - even if they are running or if the trojan has injected itself into another process
• Built-in netstat viewer
• Extensive help files
• Free technical support via e-mail

Download link

Adobe Flash CS4 + Activator  

Posted by Ashish in


Flash is the worldÆs leading authoring tool for creating media-rich web
sites, web applications, online games, streaming audio and video
presentations, animated greeting cards, and much, much more. With Flash,
it is easy to create sophisticated presentations incorporating pictures,
animation, sound, video, and special effects. In this course, author
James Gonzalez applies his many years of Flash training experience to
present step-by-step demonstrations and instructions covering a wide
range of Flash CS4 Professional animation and authoring techniques. At
the conclusion of this course, you will be well on your way to creating
the types engaging and interactive web content expected by todayÆs
sophisticated audiences. To begin learning, simply click on the movie links.

Download Link:

Download Part1

Download Part2
Download Part3
Download Part4
Download Part5
Download Part6
Download Part7
Download Part8
Download Part9
Download Part10

Contact Me On Orkut

=>Followers<=

Powered by Blogger.