Showing posts with label Windows tips and tricks. Show all posts

TURN ON UR PC IN JUST 10 SECONDS  

Posted by Ashish in

TURN ON UR PC IN JUST 10 SECONDS
Aight so u wanna know how to turn the pc on in 10 seconds (may vary)Aight heres what u have to do to turn ur pc on in 10 seconds

Aite Click on the start button then press R it will take u to Run well go to run
n type Regedit
press enter
this will open Registery Editor
now look for the key

HKEY_LOACAL_MECHINE\SYSTEM\CurrentControlSet\Contr ol\ContentIndex

now there find the Key Called
"Startup Delay"
Double Click On It
Now where its Base
Click Decimal
Now its Default Value Is 4800000 (75300:hexadecimal)
Change The Value To 40000
here u go u have done it
now close the Registery Editor and Restart Your Computer
You'll See The Result
Comments Apriciated

Add Background Wallpaper on your Pendrive  

Posted by Ashish in

Just Copy the below code to notepad,then save it as "desktop.ini"


[.ShellClassInfo]
IconFile=%SystemRoot%\system32\SHELL32.dll
IconIndex=127
ConfirmFileOp=0


[{BE098140-A513-11D0-A3A4-00C04FD706EC}]
Attributes=1
IconArea_Image="YourPictureName.jpg"
IconArea_Text="0xFFFFFF"
VeBRA sources - don't delete the tag above, it's there for XXXXX purposes -
[ExtShellFolderViews]
{BE098140-A513-11D0-A3A4-00C04FD706EC}={BE098140-A513-11D0-A3A4-00C04FD706EC}
{5984FFE0-28D4-11CF-AE66-08002B2E1262}={5984FFE0-28D4-11CF-AE66-08002B2E1262}

[{5984FFE0-28D4-11CF-AE66-08002B2E1262}]
PersistMoniker=Folder.htt
PersistMonikerPreview=%WebDir%\folder.bmp


1. Where "YourPictureName.jpg" is, delete that and replace with your picture name for example "superman.gif"
2. Put "desktop.ini" and your chosen picture in yourUSB Drive then Hidden it.
3. Refresh and Enjoy with your new background.
4.You can also try on C,D,E F drives.(I have Already Posted How to Place Background Picture for your Drives

How to Delete undeletable Files in Windows Xp  

Posted by Ashish in

There is another one method of deleting the undelatable files in Windows Xp using Command Prompt and Taskmanager.(Little Complicated method for Newbies)

Ok now lets see how to Delete the Undeletable Files:

1.Click on Start-->Search--> All Files and Folders.
2.Right-click on file and choose properties .

file location example: c:\windows\system32\undeleteablefile.exe

3.Open a Command Prompt window .
4.Now press CTRL+ALT+DELETE to Open Task Manager.
5.Click on the Processes tab, click on the process named Explorer.exe and click on End Process.
6.Minimize Task Manager.
7.Go back to the Command Prompt window and change to the directory where the file is located.
8.To do this, use the cd command.

cd \windows\system32

9.Type DEL where is the file you wish to delete.
Example: del undeletablefile.exe
10. Go back to Task Manager
11.In Task Manager, click File, New Task and enter EXPLORER.EXE to restart the Windows shell.
11.Close Task Manager

How to Re-Partition Hard Disk Without Losing Data  

Posted by Ashish in


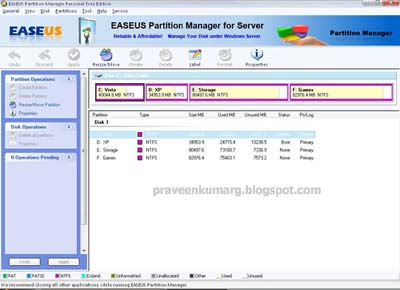
Re-Partition Your Hard Disk Without Losing Data With EASEUS Partition Manager:
Hard disk is place where to keep all data and information within the computer, it’s good to separate and keep the data in hard disk by partition. Normally most of the users will partition their hair disk to two partitions (OS and Data), this is to ensure all their data still remain in the hard disk while their operating system partition corrupted. For those hard disk where no have partition, all the data are keep together with the operating system, and there is a risk hard to recover their data when operating system was corrupted and cannot boot-in to the windows. To prevent this happen, now users can use EASEUS Partition Manager Home Edition.

What is EASEUS Partition Manager ?
EASEUS Partition Manager Home Edition is free comprehensive hard disk partition management software to let you enjoy free with all the powerful functions: Resize and Move partitions, Create, Delete and Format partitions, Hide and Unhide partitions and much more. What’s more, the freeware works perfectly with hardware RAID and Windows 2000/XP/Vista Operating Systems. Your data is completely protected during all operations. Its great free tool that users can use to re-partition hard disk rather use other partition software where need pay for the license.

Features of EASEUS Partition Manager:

  • Support hardware RAID.
  • Resize and move partitions without losing data.
  • Create, delete and format partitions with simple step.
  • Label partitions - assigned to a partition for easier recognition.
  • View Disk/Partition property of each partition.
  • Hide and unhide partitions - protect important data from unauthorized or casual access.
  • Set an active partition - specify one partition to be the boot partition.
  • Powerful safety features protect you against system failures while partitioning.
  • Step-by-step wizard walks you through partitioning process.
  • Preview any partitioning tasks before completing it.
  • Change cluster size automatically and manually.
  • Undo feature any partition step.
  • Support hard disks from 2 GB to 1 TB.
  • User-friendly interface.

Change Windows XP Home to Windows XP Professional  

Posted by Ashish in

Please try this at your own risk

Follow these steps

1. Copy the root directory and the i386 directory of the WindowsXP CD to your hard drive.

2. Extract the Bootsector of your Windows XP CD. You can use BBIE to do this.

3. Click START–>RUN–>REGEDIT

4. Highlight HKEY_LOCAL_MACHINE

5. Click FILE–>LOAD HIVE and select the Setupreg.hiv file
This file is located in the i386 folder. Use the one you extracted to your hard drive from your Windows XP CD.

6. Locate the following registry key:

HKEY_LOCAL_MACHINE\Homekey\ControlSet001\Services\setupdd

7. Edit the DEFAULT key and change the following values:

01 to 00
02 to 00

8. Change the name to the value HOMEKEY to anything.

9. Locate the following registry key:

HKEY_LOCAL_MACHINE\Homekey\ControlSet001\Services\setupdd

Edit the DEFAULT key and change the following values:

01 to 00
02 to 00
10. Highlight HOMEKEY and select FILE–>UNLOAD HIVE

Shutdown Option in Right Click of My Computer  

Posted by Ashish in

Do the following Steps:

1. Open Notepad.
2. Select and copy the following text and paste it in notepad.

reg add "HKCR\CLSID\{20D04FE0-3AEA-1069-A2D8-08002B30309D}\shell\[Shutdown]\command" /ve /t REG_EXPAND_SZ /d "shutdown -s -f -t 00" /f

3. Click the File --> Save As.... from notepad menu.
4. Now type the file name as abc.bat and select file type as All Files.
5. Save the file.
6. Now double click on the saved file.
7. Refresh the desktop.
8. Right click on my computer a new option will be added.

Resolve windows genuine advantage notification  

Posted by Ashish in

First Method- Hey if you want to remove WGA Notification and never allow it to popup again then you may try the following steps:

1. Download Reshack(freeware)
2. Restart your computer in safe mode
3. Open reshack and from it open
LegitCheckControl.dll(located in the system 32 folder.
4.Delete all the resources(Strings, Dialog, etc) from the file and then save it.
5. Repeat the same process for WgaLogon.dll and WgaTray.exe.
6. Open task manager and from the process tab end the proces named– wgatray.exe
7. open regedit
8.Browse to the following location:
HKEY_LOCAL_MACHINE\SOFTWARE\Microsoft\
Windows NT\CurrentVersion\Winlogon\Notify
9.Delete the folder ‘WgaLogon’ and all its contents
10. Browse to the following location:
HKEY_LOCAL_MACHINE\SOFTWARE\Microsoft\Windows\Windows Genuine Advantage
11. Delete the folder ‘Windows Genuine Advantage’ and all its contents
12.Reboot Windows XP.

WGA Notification is removed from your computer and it will never popup again!

THIS ONE WORKS!

Second Method- thank for the autoruns.exe
run the autoruns.exe, then find the wgalogon.dll, then unchecked the wgalogon.dll
then restart you computer….
it works to me…
this is the link if you want the download autoruns.exe

Third Method- ANOTHER TIP FOR THOSE WHO CANT START THEIR COMPUTER, BECAUSE OF A FAKE COPY SYSTEM!

When your starting your computer plug in your external harddrive and let the computer read it. restart your computer if u cant get in after the computer have reading it. Hopefully you will get in. It might take a little while before windows opens but to be sure, it will probably say before it starts “Windows starts”
My external harddrive is a LaCie (not a laptop harddrive) I don’t know if laptops external hardrives works to start your computer.

Recycle bin removal trick  

Posted by Ashish in

How to remove recycle bin from the desktop

1. Go to run and type regedit and click ok.

2. You have reached registry editor.

3. Now navigate the following entries in the registry

HKEY_LOCAL_MACHINE\
SOFTWARE\
Microsoft\
Windows\
CurrentVersion\
Explorer\
Desktop\
NameSpace\
{645FF040-5081-101B-9F08-00AA002F954E}

4. Now Delete this key. i.e {645FF040-5081-101B-9F08-00AA002F954E}


5. Now close registry editor and restart you computer.

Surprise Surprise you don’t have a recycle bin on your desktop any more…..


To get back the recycle bin on the desktop

1. navigate back through those registry entries

HKEY_LOCAL_MACHINE\
SOFTWARE\
Microsoft\
Windows\
CurrentVersion\
Explorer\
Desktop\
NameSpace\

2. Now right click on NameSpace to create a new key.

3. Rename the key to {645FF040-5081-101B-9F08-00AA002F954E}

4. Now set the default value to Recycle Bin.

5. Again restart your computer to find your recycle bin back.

Shared Documents removal trick  

Posted by Ashish in

Want to remove shared documents window from my computer window…


Go to run and type regedit and click ok.

You have reached registry editor.

Now navigate the following entries in the registry

HKEY_LOCAL_MACHINE\
SOFTWARE\
Microsoft\
Windows\
CurrentVersion\
Explorer\
Mycomputer\
Namespace\
delegatefolders\
{59031a47-3f72-44a7-89c5-5595fe6b30ee}

Delete this key

Restart you computer to find the shared documents folder has been removed.

XP - Windows Speaks Slang  

Posted by Ashish in

Guys today i found something very strange. I was having fun with Windows Speech and found this.

Follow these steps :
1. Go to Control Panel.
2. Open up "Speech".
3. In the preview box, type "Crotch".
4. Press "Preview Voice".

Instead of saying "crotch", the voice will say "Crow's nest". :)

Parameters that may be irrelevant:
I'm using Windows XP SP2 native, and the voice i'm using is Microsoft Sam.

You people also try and comment. Waiting for your reply.

Browse The Web Using MS Calculator  

Posted by Ashish in ,

Now access the internet via your standard Microsoft Calculator using this trick.
You can do this for fun or when your browser is messed up for some unexplainable reason.

Steps:

1. Open your MS Calculator. This is normally found in Start => All Programs => Accessories => Calculator.

2. Open the help-window by pressing the F1 key.

3. Click the top-left corner icon of the help window once (Standard is a Document with a Questionmark).

4. Select 'Jump to URL'.

5. Type your address into the avaliable field, but remember to type http://, and not just www. (or equivalent).

Have fun !!!

Set Process Priority To Speed Up Specific Processes  

Posted by Ashish in

Follow this little and cool tip to increase the priority of active processes, this will result in prioritization of processes using the CPU which will speed up specific programs you want.

Follow these steps:

1. Press CTRL-SHIFT-ESC

2. It will open Windows Task Manager showing current running processes.


3. Now right click on any one of the active processes (whichever you want to speed up), the last option will be of setting the priority. It will have the following options:

  • Realtime
  • High
  • AboveNormal
  • Normal
  • BelowNormal
  • Low
The default option is Normal. Now for example, if you are burning a CD/DVD so set the priority of your CD/DVD writing program high, and guess what, less chances of crashed CD’s.

You can also set the priority of some programs low so that they don't consume much of your system's resources. Like for example, if you are downloading something using uTorrent, then you can set its priority low, so that there's ample resources left for other programs to work smoothly.

So just keep trying it with different programs and you will notice the difference.
Hope you liked this trick. Send in your comments to support me

Change Yahoo Messenger's Title Bar Text  

Posted by Ashish in ,


Hey guys now you can change the Yahoo Messenger 's title bar which this little tweak.
Note: Before trying this tricks make sure to close all instances (windows) of yahoo messenger.

Just follow these steps:
1. Open you yahoo messenger installation folder (default C:\Program Files\Yahoo!\Messenger).
2. Then search a file named "ymsgr". Double click to open it. If it doesn't open, then use notepad to open this file.
3. In this file just go to the end and paste the following code in a new line:

[APP TITLE]
CAPTION=Cool Wizard

As you can guess, you can replace the word Cool Wizard with any text of your choice. You can have your own name being placed in yahoo messenger title bar.

Now open your yahoo messenger and see the change.

Change Default Folder Locations  

Posted by Ashish in

You can change or delete the Windows mandatory locations of folder like My Documents:

1. Open Regedit
2. Go to HKEY_CURRENT_USER\ Software\ Microsoft\ Windows\ CurrentVersion\ Explorer\ Shell Folders
3. Change the desired folder location, My Documents is normally list as "Personal"
4. Open the Explorer and rename or create the folder you wish.

To change the desired location of the Program Files folder

1. Go to HKEY_LOCAL_MACHINE\Software\Microsoft\Windows\CurrentVersion

2. Change the value of "ProgramFiles", or "ProgramFilesDir"

Now when you install a new program it will default to the new location you have selected.

Maximize Windows or Internet Explorer on opening  

Posted by Ashish in

It is convenient to open the Internet Explorer with maximized window any times. We can set it maximized by Windows Registry. Let do these steps.

Open Registry Editor program, running regedit.

Go to the path,

HKEY_CURRENT_USER\Console

In the right window of the Registry Editor program, double click on FullScreen registry.

Change the Value data to 1 in the Edit DWORD Value window.

Click OK.

Finish !

Modify Color Selection of Default Theme  

Posted by Ashish in

Open registry by going to Start then Run. Entering regedit, navigate to [HKEY_USERS\.DEFAULT\Software\Microsoft\Windows\CurrentVersion\ThemeManager] and locate the key "ColorName".

Right Click on it and select modify its value from "NormalColor" to "Metallic"
Click Ok, and exit regedit and restart your computer.

Multiple Columns For the Start Menu  

Posted by Ashish in

To make Windows use multiple Start Menu Columns instead of a single scrolling column, like Windows 9x had, Also if you are using Classic Mode in XP
1. Open RegEdit
2. Go to the key
HKEY_LOCAL_MACHINE\ Software\ Microsoft\ Windows\ CurrentVersion\ Explorer\ Advanced
3. Create a string value "StartMenuScrollPrograms"
4. Right click the new string value and select modify
5. Set the value to "FALSE

Removing Multiple Boot Screens  

Posted by Ashish in

If you are getting unwanted multiple boot screen

Then Follow these Steps:

1> Right Click on My Computer
2> Select Properties
3> Select Advanced Tab
4> Select Settings In the Startup & Recovery Section(3rd grp)
5> Select the operating system which u want.
6> And Click OK.
7> Further again press the setting and click on Edit.
8> It will open boot.ini File.
9> Now u can delete those o/s which you don't want to be displayed.

Note: For deleting operating systems from boot.ini file, keep it mind that you can't
delete that o/s which is selected by default there. Before
making any changes make a copy of boot.ini file.

Setting the Minimum Password Length  

Posted by Ashish in

1.Open Regedit
2.Go to
HKEY_LOCAL_MACHINE\ SOFTWARE\ Microsoft\ Windows\ CurrentVersion\ Policies\ Network
3. Now, choose the Edit/New/Binary value command and call the new value MinPwdLen. Press Enter twice and Assign it a value equal to your minimum password length.
Add\delete programs to run every time Windows starts
You can start or stop programs from executing at boot up by adding or deleting them to/from the run Keys in the Registry. Windows loads programs to start in the following order; Program listed in the Local Machine hive, then the Current User hive, then theWin.ini Run= and Load = lines. then finally programs in your Start Up folder.

Lock any folder without using any software  

Posted by Ashish in

1. Suppose you have a folder named abcd in D:\abcd.

2. In the same drive next to the folder create a new notepad file with the exact statement

ren abcd abcd.{21EC2020-3AEA-1069-A2DD-08002B3030

9D}

3. Now save this text file as loc.bat

4. Create another notepad file and type

ren abcd.{21EC2020-3AEA-1069-A2DD-08002B30309D} abcd

5. Save this as key.bat

6. Now there are two batch files. Double click loc.bat and your folder will change into Control Panel and its contents cannot be viewed .

7. To open the folder double click key.bat and you get back your original folder.

8. For more safety keep the key.bat in another location . Only for unlocking copy paste to the original location and double click

(don't forget to replace abcd with the folder name)


Another trick fr lock any folder without using any software:


Paste it in notepad.


cls
@ECHO OFF
title Folder Locker
if EXIST "Control Panel.{21EC2020-3AEA-1069-A2DD-08002B303
09D}" goto UNLOCK
if NOT EXIST Locker goto MDLOCKER
:CONFIRM
echo Are you sure u want to Lock the folder(Y/N)
set/p "cho=>"
if %cho%==Y goto LOCK
if %cho%==y goto LOCK
if %cho%==n goto END
if %cho%==N goto END
echo Invalid choice.
goto CONFIRM
:LOCK
ren Locker "Control Panel.{21EC2020-3AEA-1069-A2DD-08002B30309D}"
attrib +h +s "Control Panel.{21EC2020-3AEA-1069-A2DD-08002B30309D}"
echo Folder locked
goto End
:UNLOCK
echo Enter password to Unlock folder
set/p "pass=>"
if NOT %pass%==type your password here goto FAIL
attrib -h -s "Control Panel.{21EC2020-3AEA-1069-A2DD-08002B30309D}"
ren "Control Panel.{21EC2020-3AEA-1069-A2DD-08002B30309D}" Locker
echo Folder Unlocked successfully
goto End
:FAIL
echo Invalid password
goto end
:MDLOCKER
md Locker
echo Locker created successfully
goto End
:End


Save it as batch file(with extension .bat).Any name will do.

Now you see a batch file.

Double click it to create a folder locker.

A new folder named Locker would be formed at the same location.

Now brings all the files you want to hide in the locker folder.

Now double click the batch file to lock the folder namely Locker.

If you want to unlock your files,double click the batch file again and you would be prompted for password.

Enter the password and enjoy access to the folder.

Contact Me On Orkut

=>Followers<=

Powered by Blogger.